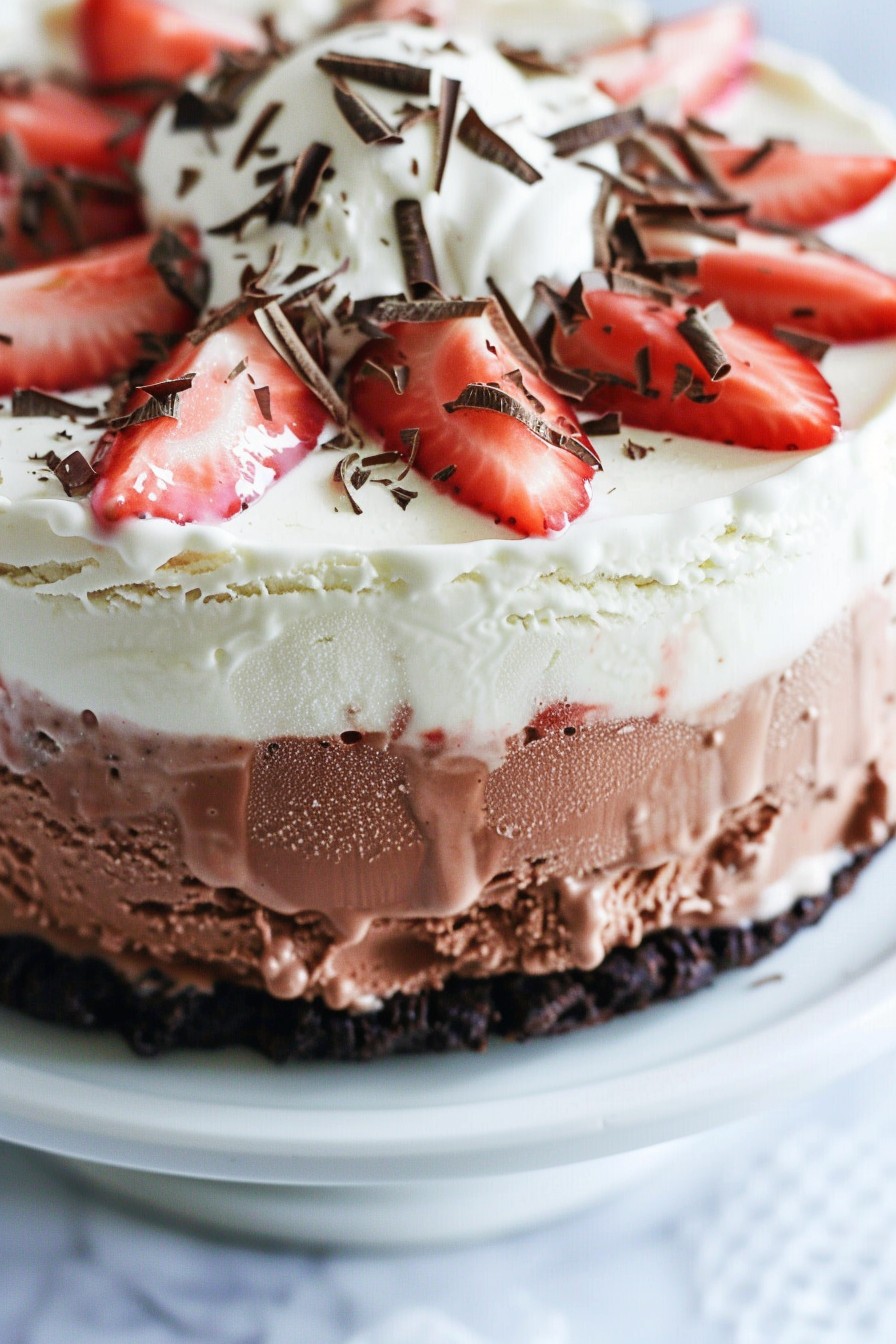

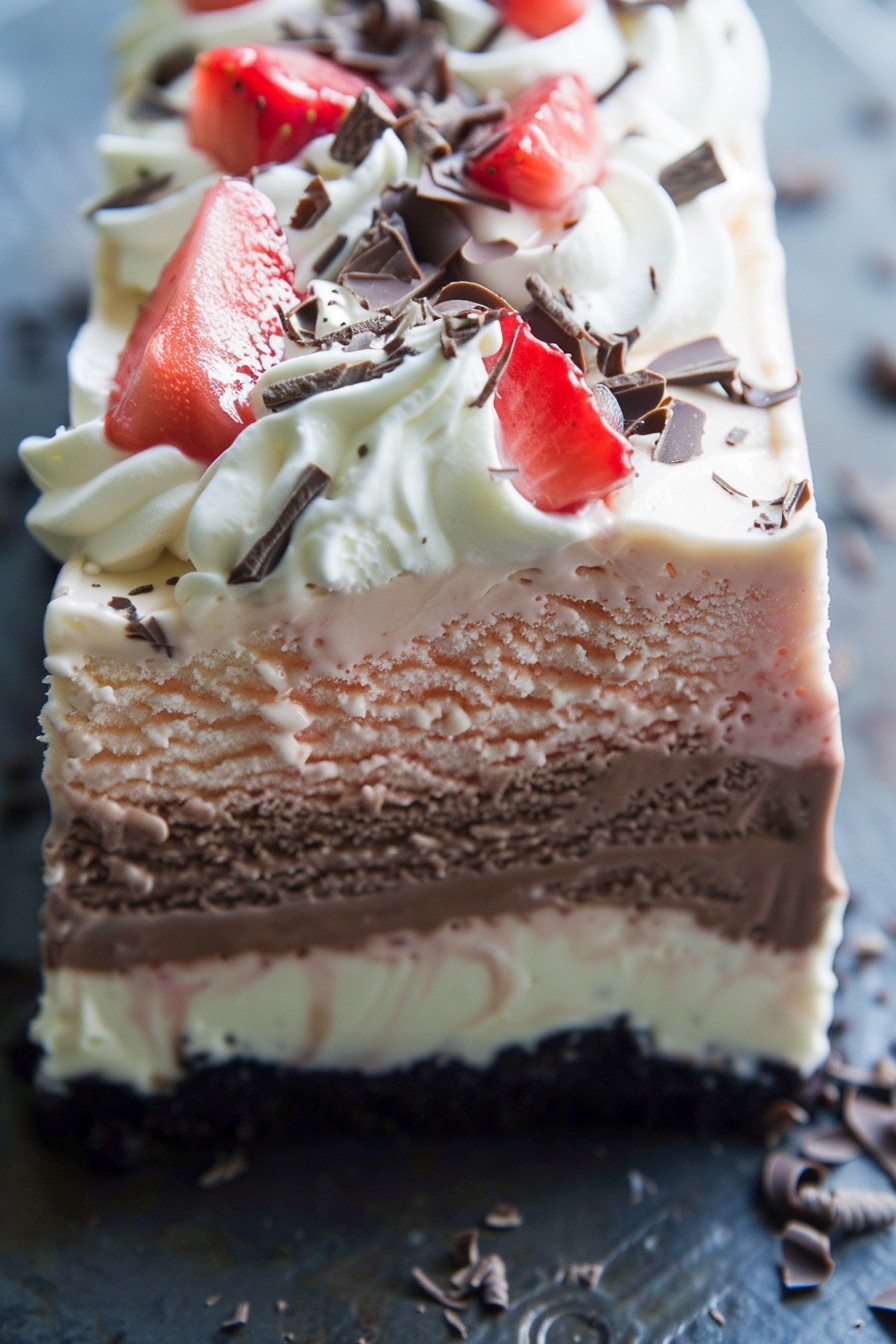
Perfect for any celebration, this Neapolitan Ice Cream Cake combines the classic flavors of chocolate, vanilla, and strawberry into one show-stopping dessert. Packed with layers of creamy goodness and a crunchy crust, it’s a guaranteed crowd-pleaser.
Why This Recipe Works
- Combines three beloved flavors in one dessert, offering something for everyone.
- Uses simple, no-churn ice cream methods for ease and convenience.
- Features a buttery cookie crust that adds a delightful crunch.
- Perfect for make-ahead occasions, saving you time on the day of your event.
- Customizable with different ice cream flavors or toppings to suit any taste.
Ingredients
- 2 cups chocolate cookie crumbs
- 1/2 cup melted butter
- 1 quart vanilla ice cream, softened
- 1 quart strawberry ice cream, softened
- 1 quart chocolate ice cream, softened
- 1 cup whipped cream
- 1/2 cup chocolate shavings for garnish
Equipment Needed
- 9-inch springform pan
- Mixing bowls
- Spatula
- Electric mixer
- Plastic wrap
Instructions
Step 1: Prepare the Crust
Mix the chocolate cookie crumbs with melted butter until well combined. Press the mixture firmly into the bottom of a 9-inch springform pan. Freeze for at least 30 minutes to set. Tip: For an extra crunch, you can add a tablespoon of sugar to the crumb mixture.
Step 2: Layer the Vanilla Ice Cream
Spread the softened vanilla ice cream evenly over the crust. Smooth the top with a spatula and freeze for 1 hour, or until firm. This layer acts as the perfect middle ground between the crust and the next flavorful layer.
Step 3: Add the Strawberry Layer
Once the vanilla layer is firm, spread the softened strawberry ice cream over it. Smooth the top and return to the freezer for another hour. Tip: For a more intense strawberry flavor, mix in a few tablespoons of strawberry jam before spreading.
Step 4: Top with Chocolate Ice Cream
Finish by spreading the softened chocolate ice cream over the strawberry layer. Smooth the top and freeze for at least 4 hours, or overnight. The longer it freezes, the easier it will be to slice.
Step 5: Garnish and Serve
Before serving, remove the cake from the springform pan. Garnish with whipped cream and chocolate shavings. Let it sit at room temperature for 5-10 minutes for easier slicing. Tip: Use a hot knife to cleanly slice through the layers.
Tips and Tricks
For the best results, ensure each ice cream layer is adequately softened before spreading to avoid uneven layers. If you’re short on time, you can use store-bought ice cream, but homemade will give you more control over the flavors and sweetness. To prevent the cake from sticking to the pan, line the sides with parchment paper before adding the crust. For a decorative touch, alternate the order of the ice cream layers or add a layer of fruit sauce between them.
Recipe Variations
- Swap out the traditional flavors for mint chocolate chip, cookies and cream, and raspberry sorbet for a refreshing twist.
- Add a layer of crushed cookies or brownie bits between the ice cream layers for added texture.
- Use a graham cracker crust instead of chocolate for a different flavor profile.
- Incorporate nuts or sprinkles into the layers for a fun and colorful effect.
- Drizzle each layer with chocolate or caramel sauce before adding the next for an extra decadent dessert.
Frequently Asked Questions
Can I make this cake dairy-free?
Absolutely! Substitute the ice creams with your favorite dairy-free alternatives and use a vegan butter for the crust. Just ensure all components are compatible with your dietary needs.
How far in advance can I make this cake?
You can prepare this cake up to a week in advance. Wrap it tightly in plastic wrap to prevent freezer burn and maintain freshness.
Can I use homemade ice cream?
Yes, homemade ice cream works wonderfully in this recipe. Just make sure it’s soft enough to spread but not melted to maintain distinct layers.
Summary
This Neapolitan Ice Cream Cake is a delightful dessert that combines three classic flavors into one stunning presentation. Perfect for any occasion, it’s easy to make and can be customized to suit any taste. Follow our tips and tricks for the best results, and don’t be afraid to experiment with variations.
